This tutorial will show you the steps required to join IVAO as a virtual pilot. It is meant to give you a short overview about the tools used, and some very basic instructions how to “behave” in this new environment.
If you have not yet done so, you will need to join IVAO to create your personal user account.
Note that this is required only once, and valid for both ATC and pilot career!
More specifically, we will show you how to…
- Download, install and set up the required software
- Connect to the IVAO Network (“IVAN”)
- Submit a (basic) flight plan
- Interact with Air Traffic Control (ATC), or how to act in absence of ATC
- Obtain further information and training
Download IvAp
The first thing you need to do is download our pilot client, IvAp, which will allow you to connect to the network. This can be downloaded from the Software Development Pages.
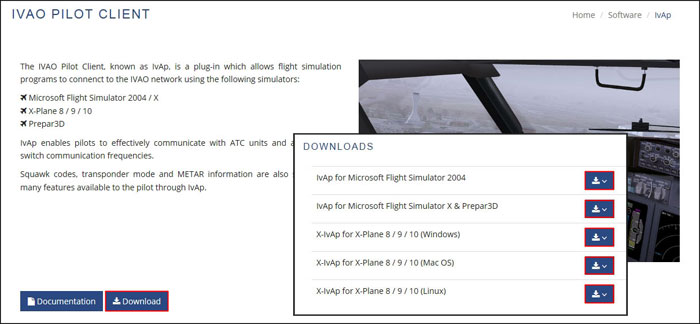
- FS 2002 and FS 2004 users should download “IvAp v1 (for FS2002 and FS2004)”
- FS X users should download “IvAp v2 (FSX Only)”
- X-Plane users should select the proper version on the Software Development Pages. Look for IVAO X-Plane Client. Note that the operation of the X-Plane Client differs from the IvAp for Flightsimulators 2002/2004/X, the basic priciples are the same however.
Once you have downloaded the program, you should run the executable file and install the program.
During the installation process you will be asked if you wish to install TeamSpeak and FSUIPC. We are using TeamSpeak for our voice communications, so if you intend to use voice for your communication with the Air Traffic Controllers (ATC) and you do not have TeamSpeak 2 installed on your computer, you should select also TeamSpeak to be installed. FSUIPC is a small module necessary for your online flying. If you do not have FSUIPC installed on your computer (or if you do not know what it is), select also FSUIPC to be installed.
When it has been installed, you should visit the configuration settings (Start Menu → All Programs → IVAO → IvAp - IVAO Virtual Pilot Client → IvAp - Configuration) and set the required options. Check the IvAp manual for a detailed description on each of the settings.
MTL (Multiplayer Traffic Library)
MTL (Multiplayer Traffic Library) will enable you to “see” other aircraft around you by installing hundreds of aircraft and their liveries into your flight simulator.
The MTL package is included in the IvAp download and will automatically install itself when installing IvAp. After installation of IvAp has completed, the MTL Downloader will run automatically and ask yout to initiate download of the MTL files.
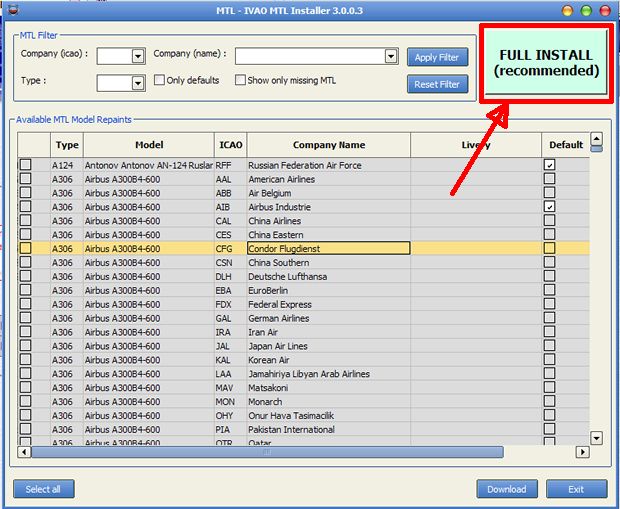
Press the green “Full Install” button to install all the MTL aircraft. Alternatively, you can select the MTL you wish to install from the list.
If you are installing all the MTL, there are over 3000 models to download so this may take some time. Once the aircraft have been downloaded, an MS-DOS window will open – do not close this window. Allow it to complete its tasks.
You may notice that Flight Sim takes long to load up due to the amount of MTL installed. You can reduce this time by hiding the MTL, which will not affect your Flightsim or IVAO experience. This can be done by visiting Start Menu → All Programs → IVAO → IvAp - IVAO Virtual Pilot Client → MTL Hide Aircraft. The following program may take a number of minutes to complete so even if it looks like your PC isn't doing anything, it is. Eventually, the MS-DOS window will open up again.
Execute your MTL installer periodically to download the latest MTL updates.
TeamSpeak
We use the TeamSpeak 2 program for voice communication. Text communication is permitted but voice is preferred. Teamspeak is included in the IvAp download package, and will be installed automatically during the installation of IvAp.
Important: IVAO is only compatible with TeamSpeak Version 2! Should you have TeamSepak 3 installed already, install our version, too.
Once you have installed and have run Teamspeak, there are some settings you must change. Open Settings → Sound Input/Output Settings.
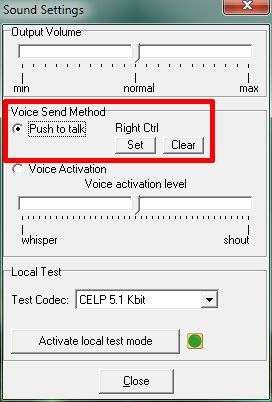
You should select the “Push to talk” method and select a key by pressing “Set”. Here you can see that Mouse btn 2 (mouse scroll wheel) has been selected as the push to talk key. Now, every time you want to transmit to the controller on the frequency, you must first press the push to talk key, speak and then let go of the push to talk key. Avoid using the “Voice Activation” method as this opens your microphone whenever noise is picked up so background noise and even you breathing, may set it off. You could then be transmitting over the channel without realising it.
As a “Push to Talk” button, select a key that does not have any function in your Flight Simulator. If this key has any function in your Flight Simulator, every time you press it to talk in TeamSpeak, the Flight Simulator function will be activated.
First Connection
The following steps are based on FS 2004. Still, FS 2002 and FS X users should be able to follow the guide.
Load Flightsim and create a flight.
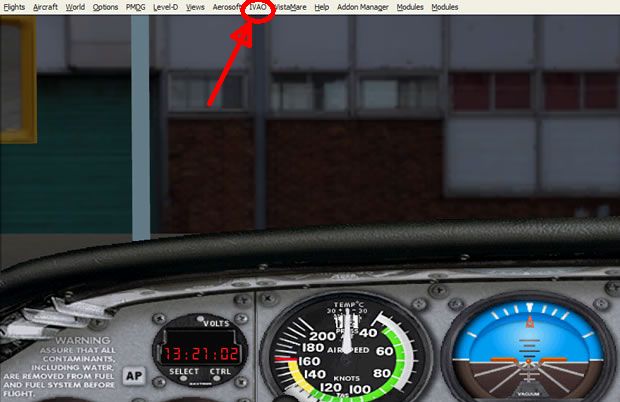
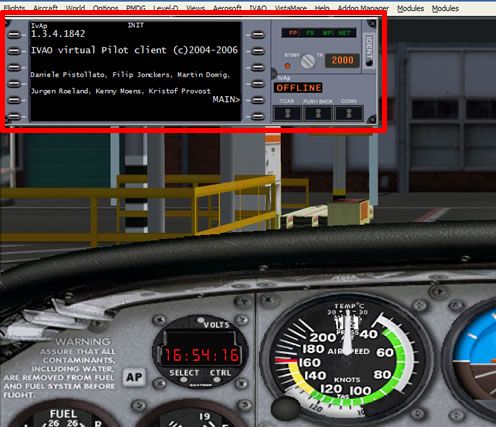
You will notice that a new menu has appeared in the flight sim task bar called “IVAO” (FS X users: Addons → IVAO). Select this menu and then press “Start IvAp”. The IvAp program will now load and you will see an icon made up of green and red dots load in your taskbar, near to your PC's clock.

Note: FS X users will not see the green and red dots.
You may see various things loading in flight sim (IvAp program/multiplayer connection), just leave these to complete what they need to do. When you see 3 green dots and 1 red dot, like in the image above, the program has finished loading.
You will now see the IvAp window in the top left hand corner of your Flight Sim.
Some important things to do before connecting to the network:
- Make sure that when you are connected, your aircraft is parked at a gate. Do not connect on the runway or on a taxiway. When choosing your airfield within the Flight Sim menus, it automatically places you on the active runway so ensure that you have selected a gate in the appropriate drop down menu.
- Do not use the slew option in flight sim to slew around the airport once you are connected. If you have to change gates just after you connected, use the options within flight sim to load your aircraft at a new gate.
- If connecting with an airline callsign, you must use the airlines ICAO code followed by the flight number, i.e. BAW123 not BA123.

To connect, press the “CONN” button. You will then be presented with a new window.
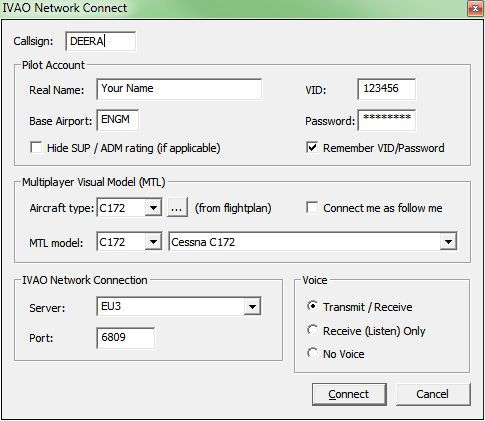
Enter the details:
- Callsign: The callsign of your aircraft, this could be your aircraft registration or flight number for example.
- Real Name: Your full name that you registered with IVAO.
- VID: Your IVAO VID that was assigned to you when you joined.
- Base Airport: An airport close to where you live, your VA base, or any airport you would class as your “base airport”.
- Password: The IVAN password you were assigned when you joined IVAO.
- Aircraft Type: The type of aircraft you are flying.
- MTL Model: The aircraft and livery you want other people to see you as.
- Server: The server you are connecting to. For best performance, use the one auto selected.
- Port: Leave this box as it is!
- If you can transmit and receive on voice, select that option. If you can receive voice but cant transmit voice, select that option. If you are text only, select no voice.
Once again, make sure your aircraft is parked at a gate before connecting!
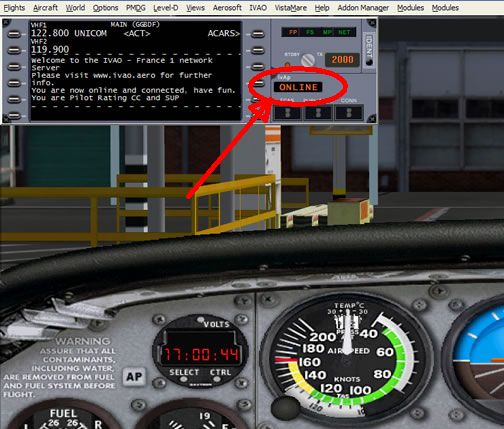
When all of the above details are correct, press the “Connect” button.
When you have successfully connected, the sign “OFFLINE” will change to “ONLINE”, and you will receive a welcome message in the IvAp dialog box and all the dots in your taskbar will have turned green.
FS X users will not see the green dots.
Flight Planning
On the IVAO Network, it is mandatory to file a flight plan for every flight. Before or after connecting to IVAN, open IvAp and press the buttons “ACARS” and “Send Flightplan”, then fill in the form. Most fields will be unknown to you, for your first flight it is sufficient to fill flight rules, departure aerodrome, route and destination aerodrome.
Some airspaces are very compact, complicated and get very congested. We recommend that your first flight is a local flight at a quiet airport (and not the big international field of your capital!) in order to start with a simple setup. The easiest way is a local flight according to Visual Flight Rules, that is doing traffic patterns around the airfield and flying in the vicinity of the airport.
For such a flight, fill in the flight plan as follows and refer to the picture for the location of the mentioned items:
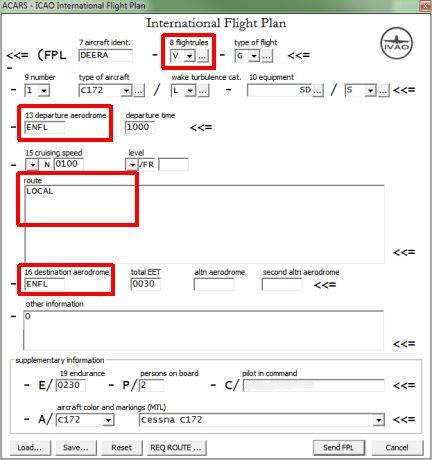
- Field 8, Flight Rules: “V” for VFR flight.
- Field 13, Departure Aerodrome: Enter the ICAO-Code of your departure.
- Field 15, Route: “LOCAL” or “DCT” for your local flight.
- Field 16, Destination Aerodrome: Enter the ICAO-Code of your destination, in this case the same as departure for your local flight.
Later on, you might want to fly a route from A to B, employing Instrument Flight Rules. To find your way, you should follow the “motorways” in the sky, or airways. There are many different sources to find these routes. The best place to get routes is from the IVAO Route Database, which lists many popular city pairs. The routes found in this database are the routings that real aircraft follow through the air.
You will need to have enroute and aerodrome charts at your disposal to follow those routes. Controllers use these charts as well and will expect you to have them. Charts for your flight can be found on the division's website of the country you are flying at (see active divisions list). Another good method is to query your favourite internet search engine for the words “[ICAO code] charts”, replace “[ICAO code]” with the code of your departure/destination airfield.
Interaction with ATC
The purpose of IVAO is to fly online with virtual Air Traffic Controllers guiding you through the skies. You should therefore have an understanding of how to communicate with controllers. The United Kingdom Division offers an example of how to communicate for a VFR and IFR flight.
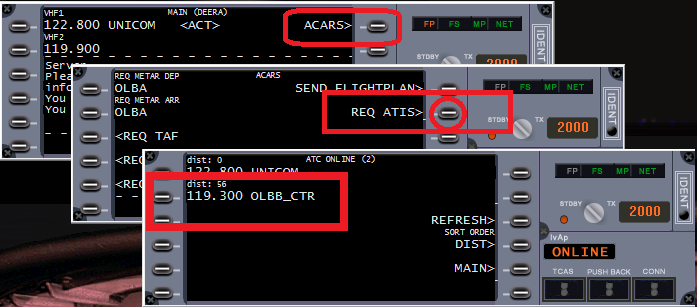
When connected and ready to start your flight, you have to make sure if there is an online ATC station in your airport or area. To do so, type in your IvAp .ATC and a list will appear with all active controllers in your area, including their respective frequencies. See the example below:
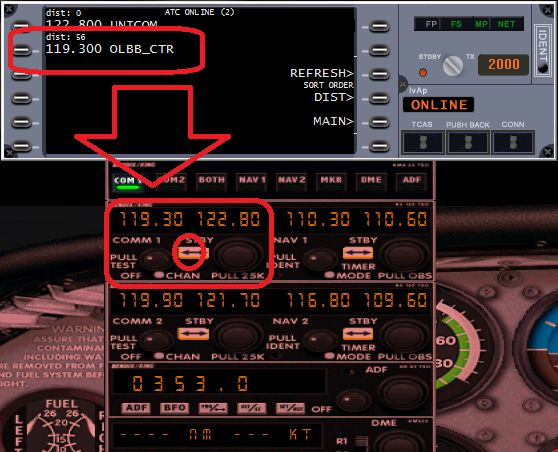
Tune the proper frequency of the controller in your radio shack. From now you can communicate with the controller.
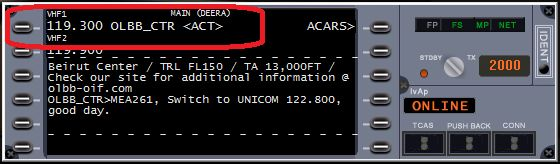
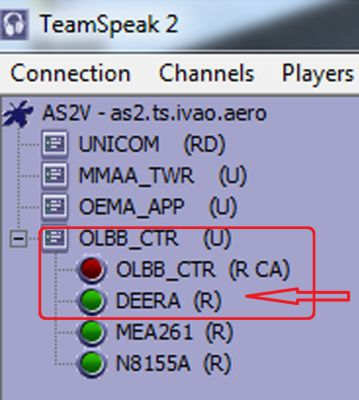
If you have selected to use voice for your communications, when inserted the appropriate frequency, you will also automatically join the TeamSpeak channel of the controller.
Before contacting the controller you should retrieve his ATIS. Knowing the information of the controller's ATIS will help you communicating and flying in his airspace. To retrieve the ATIS, you can follow the steps below:
The primary form of communication with ATC is voice. However, text communication may be used. When communicating via voice, there are some important things you should remember:
- When a controller or another pilot transmits on the frequency, wait until the other station has acknowledged and replied to the transmission before you transmit something.
- When you first connect to a new frequency, wait for a few seconds before transmitting. You may inadvertently interrupt a conversation.
If you have trouble tuning to a controller's frequency using your airplane radios, you can type in your IvAp .c [the proper frequency] and hit enter, example: .c 132.975.
Unicom
If there is no ATC online in the area where you are flying, you should tune to the Unicom frequency of 122.800 (a text only frequency) and broadcast your intentions. When flying on Unicom, keep a good look out for other traffic that may be operating in your area.
The “UNICOM” frequency here on IVAO is a text-only frequency. This means that all your transmissions in this frequency are done only by text. Hence when you select this frequency, you will not join automatically a TeamSpeak channel.
Unicom is not to be used as a chat channel. It should be used for operational messages only. You should use the private message feature within IvAp to chat to individual people.
When you first load flight sim, the default frequency is 122.950. If there is no ATC at your departure aerodrome, please remember to first of all tune to Unicom 122.800 or you may transmit your intentions on the wrong frequency.
The UNICOM frequency is not meant to chat with other pilots. If you wish to chat with another pilot or ATC, type in your IVAP .chat [airplane or ATC callsign], hit enter and a chat window opens.
Further Information
You may find our IVAO Forum (opens in a new window for better readability) incredibly helpful. A local division forum is also available, select it from the drop-down menu at the top. You can use it to ask any questions or post about any problems you are having. There are lots of people willing and able to help you make the most out of your online flying experience.
If you cannot find what you are looking in the forum or a division site, you can use your favorite internet search engine to find what you want.
Training
If you would like to extend your understanding with regards to online flying, you may find it beneficial to request a training session from your local division's training department. This can be done via the training section of your division website, which is linked to http://xx.ivao.aero/ (replace “xx” with the two-letter code of your division). If you are unsure about the correct code, visit your personal profile page – it is listed there.
And Finally…
Have fun! This is an incredibly addictive hobby. As soon as you start flying online, you will never go back to offline flying and will wonder why you didn't do it sooner!